Video Transcript
Good morning everyone, Andrew here from S&D Paving & Landscaping in Epsom. We’re currently in Redhill. This is our first job of 2024. It’s actually a really, really nice one.
Project Before Video
On this we’re going to do a full wraparound, which we love as a company. We’re starting in the back garden and we’re going to work our way through right out to this front driveway.
I’ll do you a walk in from the front to the back, just so you can get an idea of what it was like before. As you can see, we’ve got an old existing block pavement driveway. It’s been down here for many years. So we’re going to lift this, we’re going to replace this, and we’re going to use a tobermore pedesta in slate.
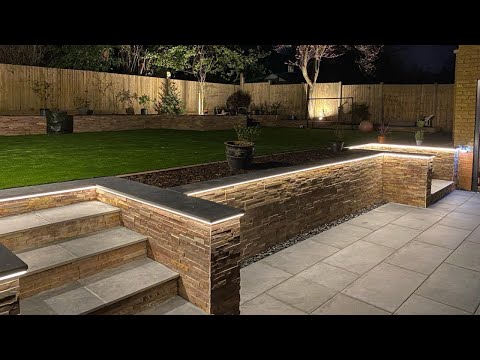
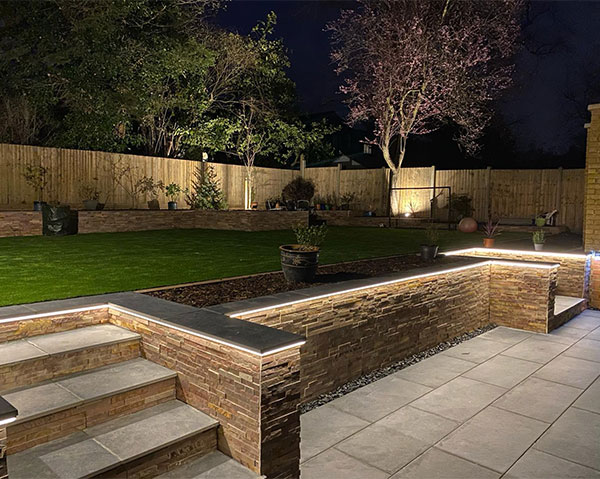
The fence here on the left, we’re going to replace that. It’s going to come down, we’re going to do a small wall on the bottom, and we’re going to incorporate the fence and wall together. So a small wall with a fence on top. That’s all going to be faced using London Stone slate facing with a lovely porcelain coping on top.
We’re going to do a new patio all the way around. So as you can see we’ve just brought our tools in. Going to do a new patio all the way around this property right over to the new sliding doors. The customer wants the garden flatter. As you can see it’s on quite a slope now. He wants it a lot flatter so his kids can enjoy it and use it as a usable space to play football and to enjoy the garden.
He’s decided not to go with natural grass. On this one we’re going to use artificial. Which we’re going to use GRASSify for. So on this retaining wall we’re going to bring it up two quarter block as you can see we’ve got one block there. We’re going to bring it up to the top of that which is two quarter block on the flat. That rises up this end and then we’re going to dig it in level and then we’re going to do a retaining wall all the way along the fence.
So we’ll have a raised flower bed at the back. What that allows us to do is lower the garden. The retaining wall will stop the soil between the fence and the garden from falling out. And that will also act as a little seat all the way around the garden for the family and kids to enjoy.
We are going to redo the steps on this side because they are absolutely not correct. And we’re going to face all that wall with some new stone clad facing. Completely change all that lawn. to artificial grass. We’re going to have a half a metre border all the way around all the edges so we can incorporate some nice, soft landscaping.
This shed is going to go, we’re putting a new Dunster office cabin here. We’re going to put some nice porcelain on this patio. We’re going to extend it out to the front about two more slabs. We are going to remove the garden storage shed that is going to be painted and refurbed and we’re putting a new patio area in that corner. And that shed will be replaced there once painted. So that’s all for now and as the job proceeds, I will do an updated video.
Garden Excavation
This job has now escalated to a much bigger job. We had a site meeting here yesterday, myself and the property owners, and they’ve now decided that they want the garden to be absolutely dead level when they come up as it’s been artificial grass and they feel that it’s going to work better for them and their family.
So now we went from one digger to two and we’ve now gone from preparing the area and taking a couple of grab loads off to probably taking out approximately 300 tons out of this garden. So as you can see, not a lot has changed at this end from the last video, but we’ve now moved and replanted the trees and bushes that were there.
So we’ve got that one. We’ve got one now over in the corner as you can see, and we’ve got another one on the other side. That’s now our finished height on the top of the block. That’ll be our coping on top of porcelain coping. And from this point right back into here is dead level. So what we do in this situation is we now excavate a foundation all the way along.
Retaining Wall Construction
We do a retaining wall and you have a raised flower bed the whole way around the garden. And we’re obviously leaving this cherry tree here. And we’re going to bring a wall out round it, make a nice 50 pence angle on the corner. Same the other side, back in and continue our wall. So this is kind of going to be a nice little seating area, south facing in the corner of the garden.
So as you can see, a massive project here for us.
We have patio and coping going in here which is more or less finished. Got our MOT down, got our sleepers in. Obviously the weather’s changed and there’s been a lot of soil and muck going on – you can see a lot of muck everywhere, but that’ll be all washed and cleaned before we proceed any further. We’ve got all our copings on yesterday, some nice 45s done on the corners.
The customer’s now decide to have a little patio area here again that needs washed off and final grouting. The raised bed cherry tree is gone and we’ve planted a new cherry tree so at least the customer can control this one to let it grow to the size he wants it to grow to.
By fitting this retaining wall and coping all the way around, it’s allowed us to lower this garden down to completely level. So once you come up your steps from the property, we are completely level. And that’s the difference of putting that wall and not everything from that patio to these steps which is the top, the finish is the top of the sleeper.
All of that is done with a laser level on this patio and it’s all one level. As you can see at the back we’ve dug this garden down about a foot and a half to get it level and we’ve had a lot of soil come out of here. So in this corner over here we’ve got a raised patio area.
As you can see we’ve got some block work retaining wall, got a patio on top. Obviously we’ve got some finishing off to do. Guys are fitting the last of the copings. We don’t like putting small pieces in where the copings are. So if you’ve noticed, Alton has measured the last two and we’ve split that one cut and we’ve put two pieces in the same size.
Then we’ve got to finish our retaining wall here along this patio. And then all that area will be filled with topsoil like another raised bed. And then you’ve got a raised patio area up here and that’ll be for the customer to put his shed on for his garden tools and then we slab that right to the fence so behind the shed he’ll have some room so whatever he’s got lying around the garden he doesn’t want to be seen.
Driveway Excavation
So today we’ve excavated the old block pavement driveway. As you can see we’ve left the front open. We’ve got our membrane and hardcore finished here. We need to set a manhole, set our curbs And then we’re going to membrane and MOT this.
So we’ve got all our MOT in, just obviously sitting in loose, roughly raked now. We have to finish our final levels. As you can see, there’s a recessed manhole cover. I’ll walk you through to the back garden, show you what we’ve done since the last video. So if you can see, if you’ve noticed, we’ve put in some new concrete posts.
These panels are just temporary, we’re waiting for the new ones to come, just so nobody can access the neighbouring property. If you walk on through here, you can see that we’ve put a coping in. We’re currently burying a water pipe for the customer to bring a cold water feed to that area for a barbecue.
It’s all very dusty now, but you can see we’ve put a coping on, we’ve cut around the posts, we’ve built a wall there, and we’ve faced it. It’s all covered in dust because we’ve been working here today. Steps are now built and wall copings are on. We’re ready to finish facing them tomorrow.
As you can see we’ve got our grit down. Six milligram of grit down. Ready for our artificial grass. Membranes down and ready. All the raised beds are in. Topsoil’s in. You can see right into this corner we’ve put back into position the customer’s original garden shed. We’ve put a single step around this area.
We couldn’t lower this area to the same level because of the tree and tree roots and the customer didn’t want to lose the tree and I didn’t want to lose the tree. So we decided to have this area raised. We’ve put a wall around it. It’s going to be a composting area for the customer.
We’ve just got to finish the facing on this wall, which we put the coping on yesterday. We’re doing a fence here – a slatted 2×1 fence.
We’re going to have a gate here in this section. And that’s just to screen what he does, whether it be ladders or bikes, it’s just an area that you don’t have to see. But yeah, absolutely delighted with this job. It’s come on fantastic.
Artificial Grass Installation
As you can see we’ve got a new driveway from Tobermore. I’ll just bring you all the way through. They have the rows for more artificial grass as you’ll see we’re fitting that now. So the guys are just cleaning out, cleaning out the drainage drains. The runoff drains on the left hand side between the fence.
You can see we’ve got our facing and steps all finished. Patio’s all done and I’ve got Jamie and Josh laying in the artificial grass, that patio is done too.
Contact Us Today
If you would like to know more about the services we offer, contact our team today.


